Part 2: The Amount of Work An Architect Needs to Find to Make $100,000

Artboard 9@2x-100

In my previous post, we looked into the cost of setting up a solo-practitioner architecture firm. Let’s say you picked the “Medium” Plan, you threw $5,500 at it and now you are on the mission to make the money back.

This is just a thought-exercise, so we are going to assume and ignore a few things. We are going to ignore the fact that business costs are tax-deductible. And we are not going into the idea of cash-flow and growth – we assume you just want a zero-sum game, one where you make all your money back plus the profit to match your original life-style, in a year.

We assume you are currently making $94,500 a year at an architecture firm. So, as calculated in our previous post, you are looking to make a gross income of $94,500 + $5,500 = $100,000.

How much work is $100,000?

For discussion, we assume you are starting small. We are going to look into three options:

  1. Any work that pays you hourly
  2. Residential renovations
  3. Single-family homes

Hourly work

According to this great resource on Architectural Fees, an average architect charges anywhere between $100 to $250 per billable hour. You can do anything from drafting, to reviewing drawings, to any kind of consulting. We assume you charge somewhere in the middle, at $150 per billable hour. To make $100,000, you need to work:

$100,000 ÷ $150/hr = 667 hours
(That’s a little under 13 hours per week)

Artboard 13@2x-100

For reference, if you work at an office which gives you 10 paid days off per year, you would have worked about 2,000 hours in 2018 ((261 working days – 10 paid vacation days) x 8 hours/day). If you are lucky to really only work 8 hours a day!

Now the biggest keyword here, of course, is “billable”. You have to find 667 billable hours – all the time spent looking for clients, drafting proposals, negotiating etc, is time you spend for free, and at your own risk.

Residential Renovations

Residential renovations are a good place to start because a lot of them require permits, and clients are relatively easy to find by being active in your community or circle of friends.

We assume a low-end/simple renovation costs $30,000. Moving a fixture, re-tiling, maybe moving one wall or replacing a door. What you charge depends on how involved you are, but let’s say you charge 15% of the construction cost. So you make $30,000 x 15% = $4,500 per renovation. To make $100,000, you need to find:

$100,000 ÷ $4,500/renovation = ~22 low end/simple renovations

Artboard 10@2x-100

We assume a high-end/complicated renovation can cost up to $100,000. Relocating an entire room, new millwork, lighting, electrical upgrade etc. Let’s say again you charge 15% of the construction cost. So you make $100,000 x 15% = $15,000 per renovation. To make $100,000, you need to find:

$100,000 ÷ $15,000/renovation = ~7 high end/complicated renovations

Artboard 11@2x-100

Single Family Homes

Last but not least let’s look at single family homes. The average size of a single-family house in america is about 2,600s.f., but we are in New York, so houses are somewhat smaller. Let’s say each house is 2,000s.f.

Again according to Architectural Fees (check that website out, it has so many helpful resources), a custom home costs about $250 per square foot to build. So the construction cost of a 2,000s.f. home is about $500,000. If you charge 10% of that, you make $500,000 x 10% = $50,000 per home. To make $100,000, you need to design:

$100,000 ÷ $50,000/home = 2 homes

Artboard 12@2x-100

That’s it! Full of assumptions and generalizations, I know, but it’s just an overview, some food for thought. Any combination could work – two billable hours here, one small renovation there, and hopefully if you did a good job, the referrals will slowly make this sustainable. One thing I realized though, is that I used to think the cost of business is very high, but after seeing all this math, the $5,500 buy-in cost isn’t so bad in the grand scheme of things. (That is , until you start renting a “real” office and hiring full-time staff.)

If you can find this amount of work, then you can afford having a similar life style as an architect who gets an annual salary of $94,500… minus the stress, and uncertainty, but also minus the pride and sense of satisfaction, if that’s what you are after.

I am in no way suggesting anyone should charge their time by hour or by a percentage of the construction cost – if anything, I think we should all challenge it!

I am all about being creative – when you do not have a job-job, how you spend your time is really up to you. You can spend half your time pursuing architectural work, and half your time selling handmade crafts on Etsy or walking dogs for people in your neighborhood. But I digress – that’s a topic for another article.

Part 1: The Cost of Setting up an Architecture Firm in New York

Artboard 8@4x-100

There was an article on Archdaily a while ago called “21 Careers You Can Pursue With A Degree in Architecture”. I liked it a lot. I like to think that with the education and training that architects get, licensed or not, we have many options when it comes to making a living, from being an artist, to being a professor, to being a politician. And that list is not even close to being exhaustive!

But let’s say you, like most people who got licensed, want to be a somewhat traditional architect, one who sets up an office the way the ARE’s taught us. And you are ready to make it on your own. What are the next steps? How feasible is that? Most importantly, is it worth it?

Money is not the only thing that matters, but it is one of the biggest hurdles. So, I want to look into the numbers, and spell them out in two posts: Part 1, how much you have to put in, and Part 2, how much work you have to find to make that money back.

Assumptions

All of these are of course very complicated, so we have to assume a lot of things. First, we will assume you want to do it alone – it’s a whole other topic to talk about starting a business with one or more partners. Then, we assume you have a spouse whose employment covers your health insurance so we don’t have to address it. (That’s a big one, I know! But I need to keep this relatively simple for discussion’s sake) We will also assume you are licensed in the state of New York (because I am, and so many things are state-specific :P)


The “Low” Plan

In a way, the absolute bare minimum to start a business can really be nothing – assuming you have a decent computer, a “magical” way of finding all the softwares, you work from home, and you set up a sole proprietorship. Most people start moonlighting this way.

Low Plan

For marketing, you can use social media services that are free, like facebook and instagram. You can host your website for free on Wix. You can find clients by attending free meetups or sitting at a bar. For printing you can send out the prints and get the client to reimburse you.

We all went to architecture school – we know how to make things work when we have to.

The “Low” Plan costs: $0


The “Medium” Plan

But we know there is no free lunch in this world and even though our “Low” Plan might be doable, it’s not that sustainable. So let’s look at a slightly more realistic and practical way to do it in our “Medium” Plan.

Insurance and Business Entity

There are risks associated with every business. Even if we try our best, there are always things that can go wrong. So, to start a company, especially if you are putting your stamp on projects and therefore putting your license on the line, it’s good to be protected.

To protect your personal assets, you can set up a PLLC business entity (Professional Service Limited Liability Company). You can also form a PC, LLP, or a DPC (read more here), but they are less common. (Interestingly architects are not allowed to set up a regular LLC (Limited Liability Company) in the state of New York.)

To set up a PLLC in New York, it costs:
Filing Articles of Organization – $200 (one-time)
Publication Fee – $50 (one-time)
(Then you pay $9 every two years to renew afterwards.)

For insurance, the most standard ones are General Liability, Professional Liability, and Worker’s Compensation Insurance. The cost is highly dependent on your experience and the state you are in, among other things, so I can only tell you what I could find. For my first year, I got the quotes (rounded numbers):
General Liability + Professional Liability – $1,350/year
Worker’s Compensation – $480/year

To protect your home address and privacy, you might want to open a P.O.box. The cost of a P.O. box varies by location, but a rough ballpark goes:
P.O. box – $100/year

Equipment & Softwares

Even though the world is moving towards being paperless, and you see architects making punch lists on ipads all the time, you will still need paper to practice architecture in the foreseeable future. I found this HP DesignJet that can print 24”-wide drawings, which should satisfy most architects’ printing needs:
Large-Format Inkjet Printer – $650 (one time)

Let’s say you only draft in 2D and you haven’t caught up with Revit yet. For software you pay:
Autocad License – $1,260/year

Office

I like working from home, but if you need an office, with the new co-working trend there are a myriad of shared-office options out there. One of the cheapest thing to do is to sign up with companies like Spacious, which gives you exclusive access to their locations with free coffee all day (think members-only Starbucks). You will have to bring and work on your laptop though:
Shared Office Membership – $1,428/year

Medium Plan

The “Medium” Plan costs: ~$5,500


The “High” Plan

If you want to go all in and use money to save yourself some time and some headaches (which a lot of times is the smart thing to do), you can invest some more in your business.

Softwares & storage

On top of 2D line drawings, it’d be nice to be able to model things in 3D, render them, and post-process the images after. If you want to access your file anywhere from the cloud, you can pay for Dropbox Plus. Prices are:
DropBox Plus (1TB storage) – $99/year
Adobe Creative Cloud License (All Apps) – $600/year
Rhino 6 License – $995 (one-time)
and/or
Sketchup Pro – $695+tax (one-time)

Office

If you want your own desk, you can sign up for a “dedicated desk” or “private office” at one of the coworking offices like WeWork. New York City is one of the most expensive cities in the states, so it’s not cheap; but it’s still cheaper than your traditional rented office space. Plus there is no commitment:
Dedicated Desk at a Shared Office – $8,400/year

Website and Domains

Although websites like Houzz can help you generate a professional portfolio, it’s still nice to make your own and have a  unique domain in your email address. You can use services like Squarespace with Google’s G Suite:
Website – $216/year
G Suite (For Business Email) – $60/year

High Plan

The “High” Plan costs: ~$15,870 (yikes)


Other Costs

I didn’t include the cost of renewing your architect license, because you have to renew it whether you start your own business or not. Anyway, let’s keep that in mind too:
NY State Architect License Renewal – $287/3 years = ~$96/year

That’s all I have! There are so many other things to pay for too, like business cards printing, continuing education, account fees, lawyer fees…etc. But in these “plans” I included the things that stick out most to me as a start-up costs. Everything else can come later. I summed them up here:

Cost of setting up an architecture office - the three tiers

(click to enlarge)

Let me know if I missed anything in the comments!

In the next post, we will talk about how we can make that money back.

Part 2: The Amount of Work An Architect Needs to Find to Make $100,000


Begin Again

Hello again world, long time no see!

After I got licensed, I left my job at a 100-person office, and started my new job at a 15-person office, working on small retail projects. While I was there, I started Project Subway NYC, studying New York City’s subway stations by creating 3D drawings of them. Then, a year and a half later, I went to work for a transportation company as an urban designer, learned a lot about wayfinding, infrastructure and urbanism. While I was there I moved from New York to New Jersey. Another year and a half later, I quit and now I am “fun-employed” – taking a break while trying to make it on my own. Also doing some freelance work.

That’s the gist of what I have been doing since getting licensed! All over the place ain’t I?

As I navigate the scary world of entrepreneurship while trying to apply what I have learned from the exams in real life, I suddenly felt the urge to start writing again. (I thought about saying “blogging”… but who blogs any more? It’s 2018!)

To quote Atul Gawande, one of my favorite writers, one way of being a positive deviant is to write something. In this book “Better: A Surgeon’s Notes on Performance“, he wrote:

It makes no difference whether you write five paragraphs for a blog, a paper for a professional journal, or a poem for a reading group. Just write… It need only add some small observation about your world.

… by offering your reflections to an audience, even a small one, you make yourself part of a larger world.

So here I am! I shared snippets of my world with you when I was taking the exams, and now let’s see what I can actually do with the license. Bottom line, this blog has always made me feel less alone, and I hope it does the same to you!

2018-10-18 - site

Architecture, Capital A!

ARE 5.0 Content

ARE 5.0 Content

Visualizing ARE 5.0 [Part 1] [Part 2]

NCARB launched ARE 5.0 on November 1 last year, and it would eventually phase out ARE 4.0. Everyone is wondering what the best thing to do is, and the discussion on how the transition would happen continues. Given how much time, effort and money it takes to complete the exam, this concern is of course understandable. But poor ARE 5.0 has been living under the shadow of ARE 4.0 ever since it was announced. Let’s give it a fair chance shall we? Forget ARE 4.0. Pretend we were born yesterday and decided to go for the Architect Registration Exam, and can afford up to five years to do so. What does the exam look like?

Content and Overlaps
ARE 5.0 has six divisions: Practice Management (PcM), Project Management (PjM), Programming & Analysis (PA), Project Planning & Design (PPD), Project Development & Documentation (PDD), and Construction & Evaluation (CE). Don’t let these terminologies confuse you. The first one, PcM, is about how to set up and run an office, and the second one, PjM, is about how to manage time and resources over the course of a project. The other four tests (PA > PPD > PDD > CE) basically follow the standard phases that most of us are familiar with: Conceptual Design, Schematic Design, Design Development, Construction Documents, Bidding and Negotiation, and finally Construction Administration.

The graphic above summarizes the content of all six divisions and illustrates where they overlap. Very much like project phases, the objectives of the divisions might be defined in a clear-cut manner, but in reality they most often merge, blur and slide from one to another.  The left half of the diagram (PcM, PjM, CE) is more on the administrative side, while the right half (PA, PPD, PDD) is more on the technical side, but again, things you studied for one division will most probably appear in another. The diagram is meant to provide a big picture rather than accurate details, so refer to NCARB’s ARE 5.0 Handbook for the official syllabus.

Testing Order
Since the divisions more or less follow an architect’s duties in a project’s timeline, it seems logical to take them in that “chronological” order: PcM > PjM > PA > PPD > PDD > CE. In fact, that’s how they are ordered in all NCARB publications. Another approach would be to take all the administrative ones first, then move on to the technical ones: [PcM + PjM + CE] in any order > [PA + PPD + PPD] in any order.

Worth noting is that PPD and PDD have 120 questions each, so they are significantly (30-50%) more intense than the other four. They do have a lot in common so it is advisable to take them back to back, but depending on your schedule and stamina, you might want to consider sandwiching at least one exam in between.

Format
Each test will have 80 to 120 questions. These questions are either Multiple Choice, Check All that Apply, Fill in the Blanks, or the three new question types that are more interactive: Case Studies, which requires you to cross reference multiple pieces of information; Hot Spots, which you answer by clicking a region in an exhibit; and Drag-in-Place, exercises in which you drag design elements or their labels into a drawing.

Since NCARB had made a conscious effort in making the test software user-friendly, learning how to navigate through the information given and input your answer shouldn’t be that big of a hurdle. That said, be sure to familiarize yourself with the format and interface by checking out the “ARE 5.0 Demo Exam”.

Reference and Study Materials
In the following months a few third party publishers will publish textbooks on the exams, which will organize and condense the content in NCARB’s long list of suggested reference for each division.  These books will definitely be helpful and become the go-to study materials, but since NCARB has no control over these third party publishers, make sure you always start with NCARB’s official ARE 5.0 Guidelines and ARE 5.0 Handbook, as well as the video series on youtube.

Visualizing ARE 5.0 [Part 1] [Part 2]

ARE 4.0 – 5.0 Transition

test 2

Hello world!!! I cannot believe it has been almost three years since I passed my last exam. I hope you are all doing well!

Since NCARB launched ARE 5.0 in November last year, I have been meaning to update my graphics to show how the transition works. It is now six months into the transition, so I am a little late to the party, but today I am excited to finally share what I have put together! Here you go:

ARE 5.0 Transition

Visualizing ARE 5.0 [Part 1] [Part 2]

ARE 4.0 – 5.0 Transition
From November 2016 to Jun 30, 2018, candidates will have the choice of staying with ARE 4.0, going for ARE 5.0, or doing a combination of both. If you are still deciding between “ARExit” and “AREmain”, let’s review the differences between the two:

Things that did NOT change
The ARE is not looking for the best “Designer” per se. Instead, it accesses a candidate’s knowledge and skills to provide various services in the practice of architecture, with a focus on the services that affect the public’s health, safety, and welfare. It is a test of objective competency, not subjective excellence. That is consistent across ARE 4.0 and ARE 5.0.

In terms of difficulty, NCARB states that “ARE 5.0 will not be easier or harder than ARE 4.0”. This can mean that the content is going to be the same, just structured and presented differently, or that they are going to adjust the cut score to keep the overall passing rate close to that of ARE 4.0. Either way, do not pick either exam because one is going to be easier than the other – neither is easier or harder; they are just different.

Things that DID change
While the mission, content and difficulty stay the same, the format is going to change. The biggest difference is that there will be six divisions instead of seven, and there will no longer be vignettes in ARE 5.0. We will cover that in greater detail in the next article.
When we discuss the contents of these exams, it is hard to avoid jargon like “analysis”, “management”, and “development”. For the sake of comparison, let us boil an architect’s job down to a simplified, model narrative called “the life of a project”:

The Life of a Project ARE 4.0 ARE 5.0
Once upon a time, there was an architect.
He set up his business, rented an office, bought insurance, hired some people, managed his finances, and found a client. CDS PPP PcM
He negotiated, decided on a method of delivery and a form of payment, and signed a contract. CDS PPP PcM PjM
He started by looking at the budget and scope and worked out a schedule. CDS PPP PjM
He then did research on zoning regulations and historic preservation. PPP PA
After that he examined site conditions including the urban context, soil for foundation, topography, vehicular and pedestrian access, parking, trees, and, views. SPD PA
He also made sure to drain the site properly. SPD PA
He then developed a program with the client, identified the main goals and priorities of the project, PPP PA
drew up the schematic layout, SD PA PDD
and started looking at different structural systems. SS PPD PDD
Even though he was working with a structural engineer, he understood basic structural concepts like tension, compression, and shear. He could lay out a simple column-beam system. He also knew the properties of concrete, wood and steel. SS PPD PDD
And he knew how to prepare the building in case of earthquake or hurricane. SS PPD PDD
Once he had an idea of the form, layout and structure, he started developing details, materials, and finishes – from the bottom up and inside out – floors, stairs, walls, windows, ceilings, roofs, paints, tiles, millwork, everything. BDCS PPD PDD
He had to incorporate different building systems including mechanical, electrical and plumbing. BS PPD PDD
He also coordinated the RCP – lighting, diffusers and sprinklers etc. BS PPD PDD
While he was doing all these, he took into account building code regulations, accessibility requirements, sustainability, ALL
and budget concerns. CDS PPP PPD PDD
After the design took shape, he moved on to producing construction documents. CDS PjM PDD
He worked with his team to make sure the drawings and specifications have the right information. CDS PjM PDD
The project then went to bid, and a contractor was hired. CDS PjM CE
During construction, he visited the site once in a while. CDS PjM CE
He also answered questions and provided drawings when needed. CDS PjM CE
When the project was substantially complete, he makes a punch list, and eventually closes out the project. CDS PjM CE
He went back to evaluate and think about what he learned from the project, and how to get better. CDS CE
Then, the story starts all over again.

Our profession is constantly in flux, and the process of design is anything but linear, but assuming on the left are the basic responsibilities of an architect, then on the right is how ARE 4.0 and 5.0 divide them.

In a nutshell, ARE 4.0 is more discipline-based, while ARE 5.0 is more project-phase-based. There are two key takeaways:

  1. Perhaps because there is an increasing need for architects to have leadership and entrepreneurial skills in this modern economy, ARE 5.0 has dedicated an entire division to test candidates on how architects set up and run an office, called Practice Management (PcM).
  2. The keyword for ARE 5.0, especially in Project Planning & Design (PPD) and Project Development & Documentation (PDD), is “integration” – on top of having technical knowledge in different disciplines, it requires candidates to cross-reference and integrate that knowledge into different phases of a project.

Transition and credit model
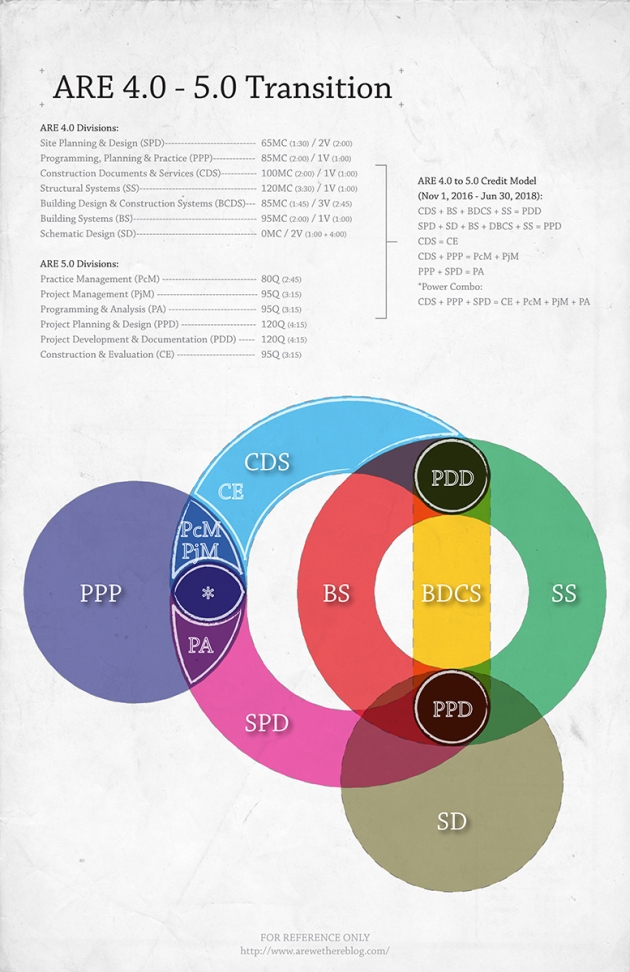
The graphic on top of this post illustrates how NCARB has regrouped the seven tests in ARE 4.0 into the six in ARE 5.0, and denoted by an “ * ” symbol is the sweet spot where you can take three exams (CDS + PPP + SPD) in place of four (CE + PcM + PjM + PA). Those three, plus the remaining two of ARE 5.0 (PPD + PDD), makes the “power combo” (or “loophole”) of getting licensed in just five exams.

While going for the “power combo” is the most popular choice, bear in mind the following:

  1. The right half of the diagram shows how they have condensed three of the heaviest exams (BDCS + SS + BS), and more, into two (PPD + PDD). This can potentially mean that PPD and PDD, with 120 questions each, are going to be very very hard.
  2. If you have just started, it’s worth taking a quick look at the passing rates of the 4.0 exams. The passing rate of CDS in 2016 has been 58% – not great. Of course, EVEN if you fail, you will have time to retake it before Jun 30, 2018. It’s just that you have to plan it more carefully.

Meanwhile there are pros and cons to starting afresh with ARE 5.0 – pros include having one less division and no vignettes at all, and having full five years to complete all divisions; cons include not having a breadth of knowledge, information and discussions out there, and the many many unknowns. At the end of the day, you just have to take the time constraints into consideration, pick the narrative that you identify more with and see yourself do better in, develop a strategy that works best for you, and go for it. Don’t overthink, don’t procrastinate, and don’t be intimidated.

If you do decide to go straight to ARE 5.0, follow us to the next article where we review its content!

Visualizing ARE 5.0 [Part 1] [Part 2]

Thaddeus in NYC!

The legendary ARE Structural Systems tutor David Thaddeus is coming to NYC next week (5-7 June)!

The three-day, 30-hour intensive course will take place at Perkins Eastman’s office, near Union Square. (I can’t find how much it will cost though…)

I actually don’t know anyone who took the course myself – but words are if you schedule your test 2 weeks or so after you take that class, you have a very high chance of passing. Check it out:

https://david-thaddeus.squarespace.com/calendar

Watch youtube videos at speed 2x

When one is tired of reading lengthy study materials, sometimes watching explanatory youtube videos is a good way to take a break, while still getting some studying done. The problem is, while some videos are informative, they are often at a very slow pace, some even more boring than plain text.

Recently my friend Ninad shared a simple trick with me to overcome this – he said to simply watch the videos at twice the speed. It works surprisingly well! Even the narration can still be understood. Use this one as an example: https://www.youtube.com/watch?v=UQ_8aPTydr4

youtube speed

Click on the little gear icon to speed up the video

For vidoes like these, ones that just give you a little bit of visual aid/ big picture rather than specific details, I think this is the way to go. Now you can be twice as efficient!